While most of the Collection operations are done automatically, sometimes it is required to do it on an immediate basis for quick reflection on the frontend. The purpose of this guide is to help you do a few operations manually on Collection.
Whenever the user makes any updates to the collections, such as changing the sort order, adding a new product, deleting an existing product, or creating a new collection, here are a few scenarios where you would like to do this quickly,
- Auto Collection conditions are updated.
- The list of Products in the Manual collections is updated.
- Added new collection
- Disabled Existing Collection
- Updated Manual Sort order of the collection.
- etc…
We can do the following processes to ensure the displayed results are updated quickly on the front end accordingly.
- Add Updated Products in Sync
- Add in Collection To Display List
- Remove From Collection To Display List
- Force Sync Products Order
- Add All Products In Sync
The detailed user case of all the options mentioned above is as follows.
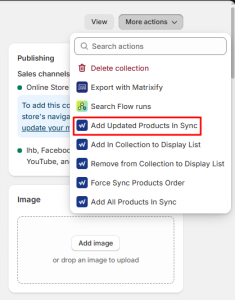
- Add Updated Products in Sync: Whenever any user updates a new product in the collection (Add or Delete) for both manual and automated collection, then users can click on this option to sync the updated collection products with Wizzy.
- Navigate to the collection where the product was recently updated (added to or deleted).
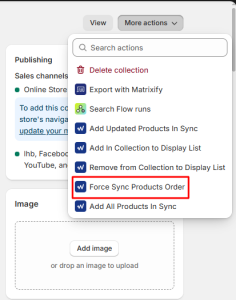
- Click the ‘More Actions’ button located at the top right corner of the screen. [As Shown in the Image below]
- Navigate to the collection where the product was recently updated (added to or deleted).
-
- Click on the option “Add Updated Products in Sync”.
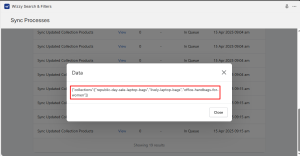
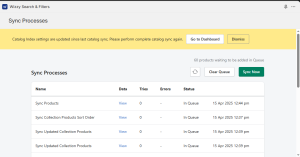
- It will automatically redirect you to the ‘Sync Processes’ page of the Wizzy App. [As Shown in the Image below]
- Add In Collection To Display List: When a user clicks on this option, the selected collection is added to the display list, making it visible on the frontend on Wizzy-powered Search & Collection Pages. This is required when you have just added a new collection and want it to be displayed on the frontend.
- Navigate to the newly created collection or the collection that needs to be displayed on the frontend.
- Click the ‘More Actions’ button located at the top right corner of the screen. [As Shown in the Image below]

-
- Click on the option “Add Collection to Display List.”
- It will automatically redirect you to the ‘Catalog Index’ page of the Wizzy App.
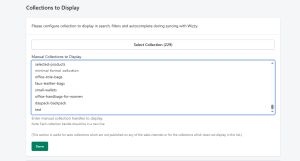
- Navigate to the ‘Collections to Display’ section, where you can see that the collection handle has been automatically added to the list. [As Shown in the Image below]

-
- After the collection handle is added in the ‘Collections to Display’ section, all the products within the collection must be synced.
- Navigate back to the collection that you recently added to the ‘Collections to Display’ section.
- Click the ‘More Actions’ button located at the top right corner of the screen. [As Shown in the Image below]

-
- Click on the option “Add All Products In Sync.”
- Once all the products are synced successfully, they will be displayed on the frontend with all the updated data.
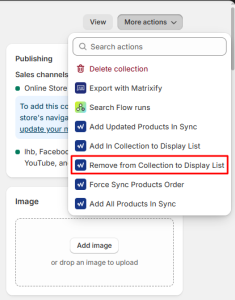
- Remove From Collection To Display List: When a user clicks on this option, the selected collection is removed from the display list, making it no longer visible on the frontend of Wizzy Led Search & Collection Pages. Removing a collection from the display list hides it from users, but the collection and its products remain in the system. This is required when you have recently disabled a collection from an Online Store.
- Navigate to the collection that needs to be removed from the frontend.
- Click the ‘More Actions’ button located at the top right corner of the screen. [As Shown in the Image below]
-
- Click on the option “Remove From Collection To Display List.”
- It will automatically redirect you to the ‘Catalog Index’ page of the Wizzy App.
- Navigate to the ‘Collections to Display’ section, where you can see that the collection handle has been automatically removed from the list. [As Shown in the Image below]
-
- After the collection handle is removed from the ‘Collections to Display’ section, all the products within the collection must be synced.
- Navigate back to the collection that you recently added to the ‘Collections to Display’ section.
- Click the ‘More Actions’ button located at the top right corner of the screen. [As Shown in the Image below]

-
- Click on the option “Add All Products In Sync.”
- Once all the products are synced successfully, they will no longer be visible on the removed collection on the frontend.
- Force Sync Products Order: Whenever a user makes changes to the sort order of a collection, or if the sort order is not reflected as it appears in the Shopify backend, the product sort order can be synced using this option. This will update the sort order in Wizzy, ensuring it is displayed correctly on the frontend. This option will only sync the sort order of the collection. [Note that Wizzy handles this operation automatically and is only required for any quick syncing.]
- Navigate to the collection whose sort order is changed.
- Click the ‘More Actions’ button located at the top right corner of the screen. [As Shown in the Image below]
-
- Click on the option “Force Sync Products Order”
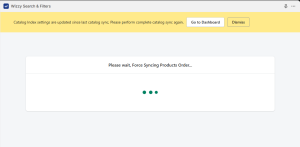
- Before landing on the ‘Sync Processes’ page, the system will internally process the sort order update. This may take some time, depending on the number of products in the collection. The processing page will appear [As Shown in the Image below]
- Add All Products In Sync: Whenever a user performs any of the tasks—either ‘Add to Collection to Display List’ or ‘Remove from Collection to Display List’—all the products must be added to the sync by clicking on this option. This step is typically performed after all changes to the collection are completed, as it serves as the final action. It ensures that all updates made to the collection are synced with products in Wizzy.
- Navigate to the collection in which you recently added or deleted any products.
- Click the ‘More Actions’ button located at the top right corner of the screen. [As Shown in the Image below]

-
- Click on the option “Add All Products In Sync”.
- It will automatically redirect you to the ‘Sync Processes’ page of the Wizzy App, where all the products will be queued to be synced [As Shown in the Image below]
- Once all the products are synced successfully, the applied update will be displayed on the frontend.
NOTE: The time taken to sync a collection or its sort order depends on the number of products in the collection and the number of ongoing sync processes of the same type.