• Home
  • Docs
    • User Manual
    • Magento 2 Manual
  • APIs
  • Back to Wizzy
  • Support
  • Home
  • Docs
    • User Manual
    • Magento 2 Manual
  • APIs
  • Back to Wizzy
  • Support
home/Knowledge Base/Shopify Manual/Setup

Sync Data

17 views 0 February 27, 2023 naiteek

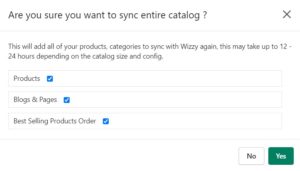
To sync the catalog with Wizzy go to Dashboard and then click on the Sync Catalog button. A popup will be displayed where you can select the type of data that needs to be synced (Add all products in Sync, Add pages in sync, and Add Best Selling Products Order), and further give a confirmation for whether you want to sync or not. If you are performing the sync for the first time, select all the options and click on the Sync Now button to add all the data into Sync.

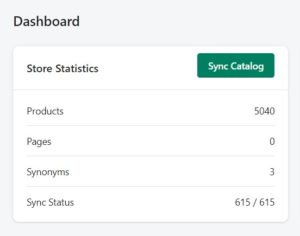
To verify, go to the Sync Processes sub-section in Wizzy App. Wait for approximately an hour (Depending on Catalog Size) before all the products are synced. To verify, come to Dashboard, and in the first widget (Store Statistics) you will see sync status xxx/xxx.

Was this helpful?

Yes  No
Related Articles
  • Enable Wizzy on Collection Page
  • Theme Customization
  • Enable Search & Filters
  • Installation
Leave A Comment Cancel reply

Setup
  • Sync Data
  • Enable Wizzy on Collection Page
  • Theme Customization
  • Enable Search & Filters
  • Installation
Categories
  • Magento 2 Manual
    • Advanced Setup
    • Autocomplete Menu
    • Catalog Index Configuration
    • Search UI Customisation
    • Setup
  • Shopify Manual
    • Advance Setup
    • Attribute Configuration
    • Autocomplete Configuration
    • Catalog Index Configuration
    • Search Result Page Configuration
    • Setup
    • Troubleshooting
  • User Manual
    • Account
    • Analytics
    • Billing
    • Currencies
    • Developers
    • Stores
    • Synonyms
  • team@wizzy.ai
  • +91-9106141411
  • © 2023 Wizzy Softech Pvt. Ltd. All Rights Reserved